Picture this: you log in to make a quick update to your WordPress site, but instead of your familiar dashboard, you see only an error message. Without a backup, years of work could vanish in an instant.
Surprisingly, many WordPress users neglect learning how to backup a WordPress site until after disaster strikes. This guide aims to change that by showing you five proven methods to safeguard your website data.
We’ll explore plugin-based solutions, hosting provider tools, and manual techniques that give you complete control over your backups. Each method includes step-by-step instructions suitable for various skill levels.
Table of Contents
- Method 1: Using WordPress Backup Plugins (Recommended)
- Method 2: Manual WordPress Backups via cPanel
- Method 3: Backing Up WordPress Files Using FTP
- Method 4: Using Your Hosting Provider’s Backup Solutions
- Where to Store Your WordPress Backups Securely
- Why Backing Up Your WordPress Site Is Non-Negotiable
Method 1: Using WordPress Backup Plugins (Recommended)
For most site owners, backup plugins provide the perfect balance between simplicity and flexibility. They automate the backup process while giving you control over what gets backed up and where those backups are stored.
Why Choose a Backup Plugin?
Backup plugins excel at creating complete website copies with minimal effort. They can:
- Schedule automatic backups at your preferred frequency
- Store backups in various locations including cloud services
- Make restoration quick and straightforward
- Offer incremental backups to save space
- Provide selective backups of specific components
While you’re protecting your site, consider enhancing its look and functionality with a premium WPZOOM theme. Find themes that work beautifully with essential plugins.
Setting Up UpdraftPlus for WordPress Backups
UpdraftPlus stands out as one of the most popular backup plugins with over 3 million active installations. Here’s how to get started:
1. Install and activate the plugin.
Go to your WordPress dashboard and navigate to Plugins > Add New Plugin.
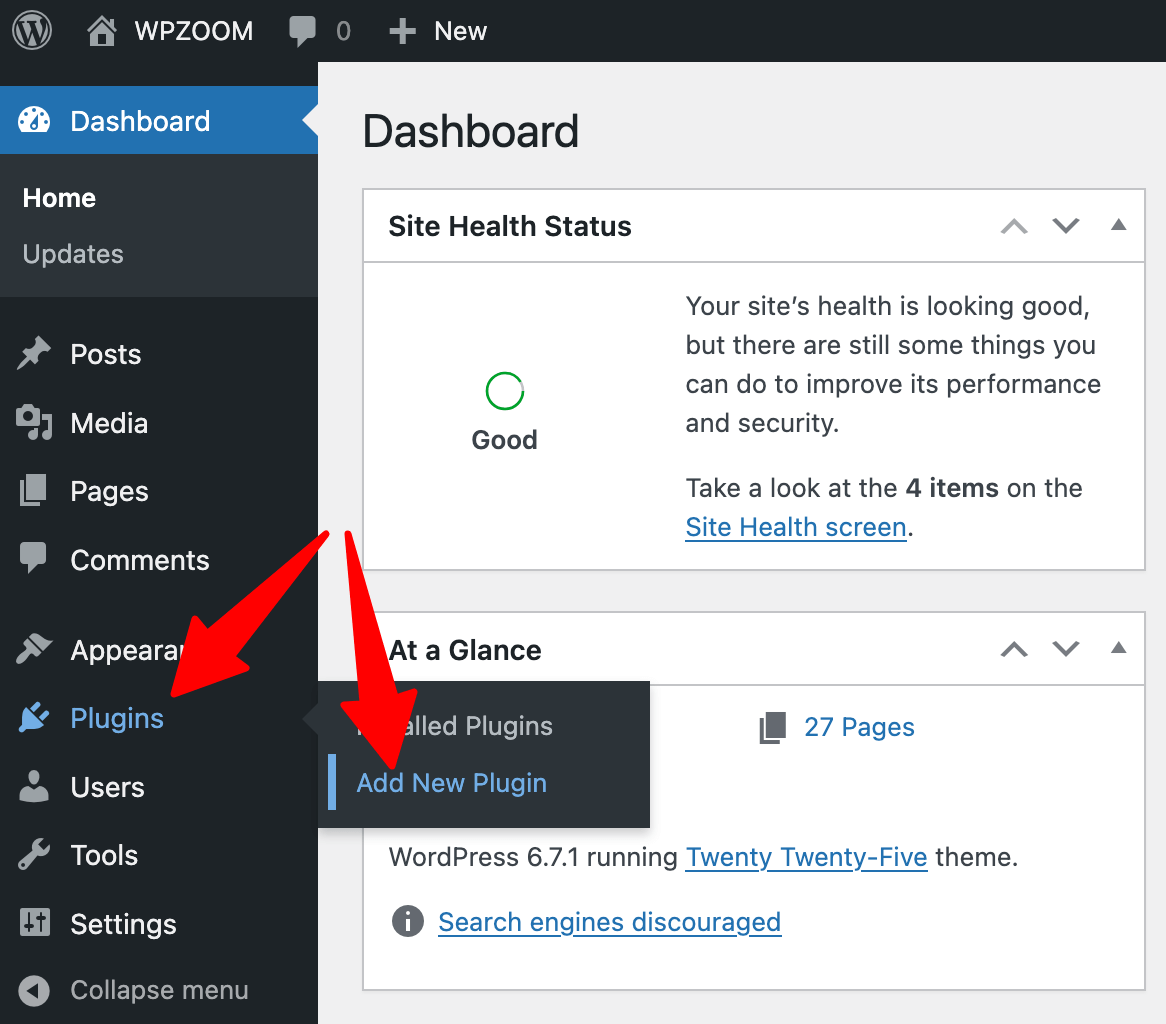
Search for “UpdraftPlus” and click “Install Now” and then “Activate.”

2. Configure backup settings.
Find UpdraftPlus in your dashboard menu and click it.

Click on “Settings” tab.
Set your preferred backup schedule (daily, weekly, or monthly).
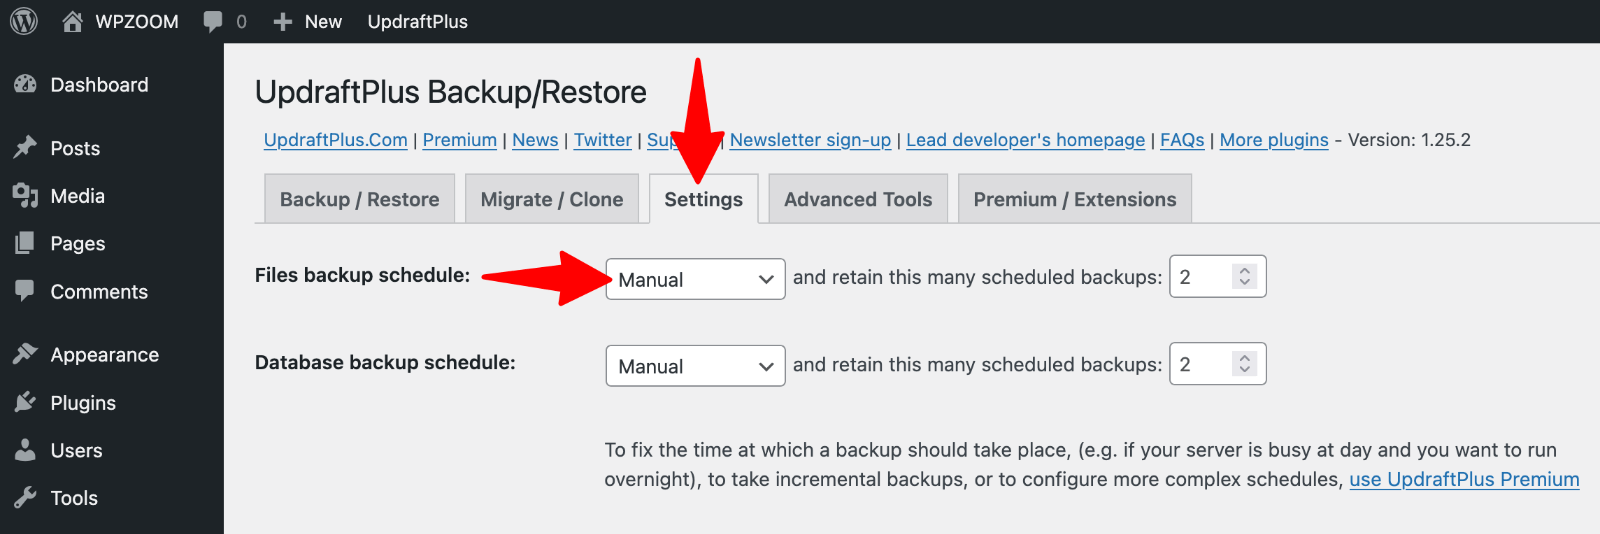
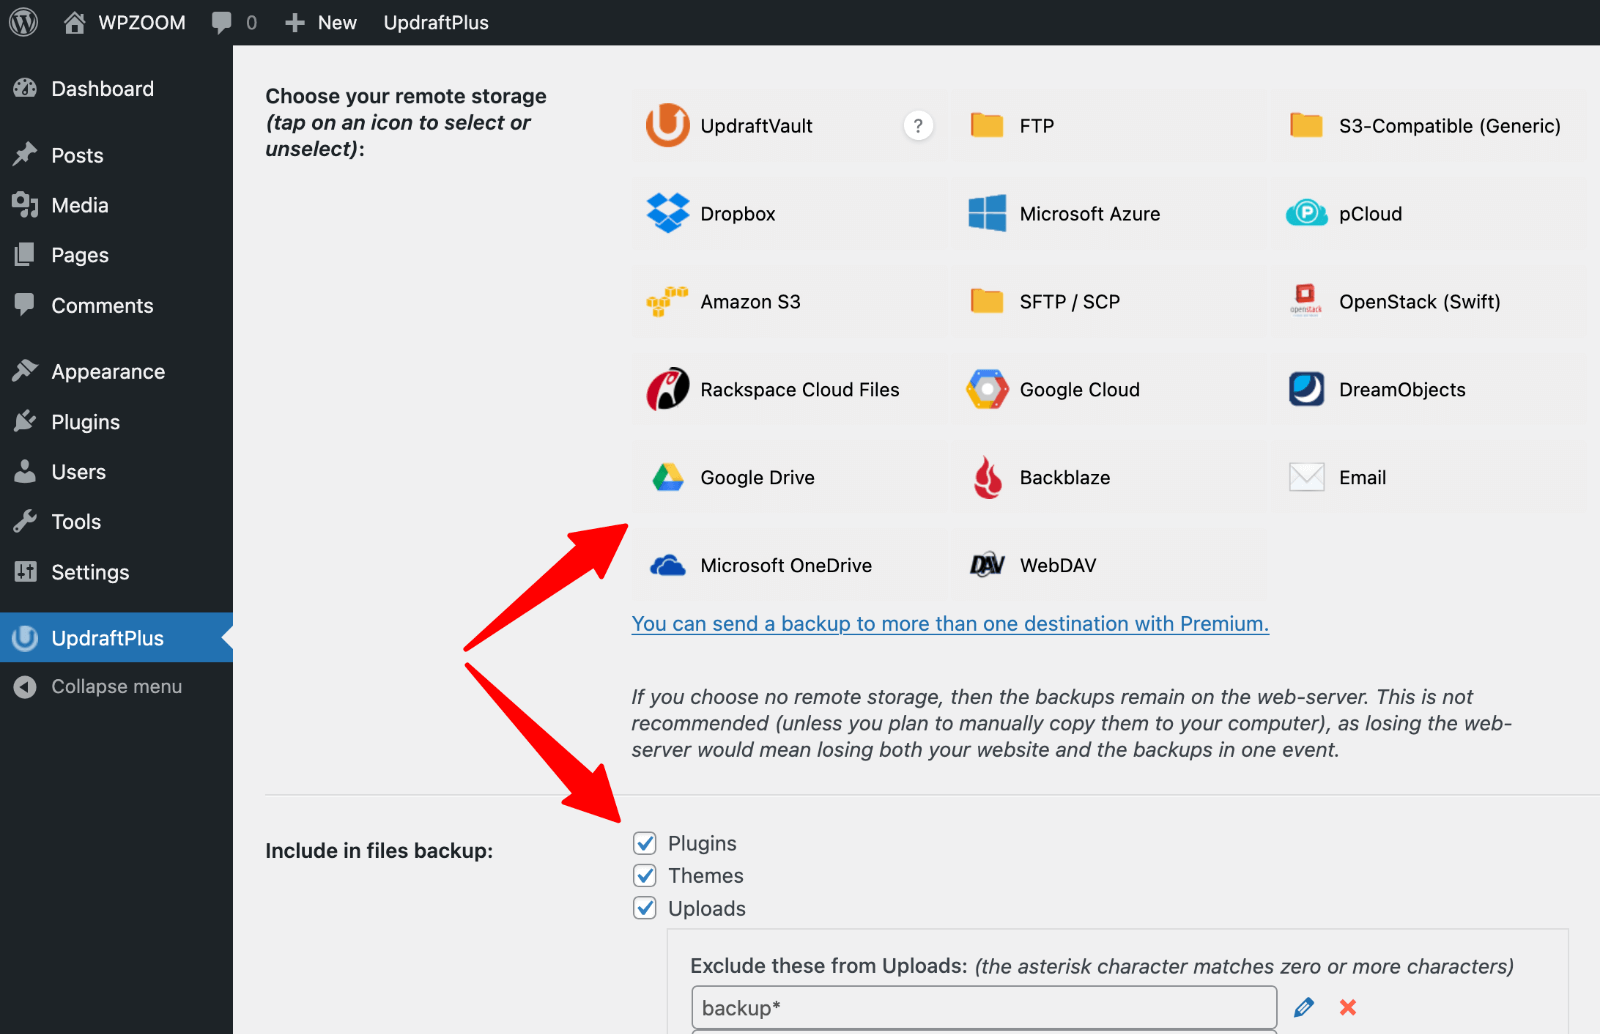
Select where to store backups (local, Dropbox, Google Drive, etc.).
Choose what to include (files, database, plugins, themes).
Scroll down and click “Save Changes”.
3. Create your first backup.
Click UpdraftPlus from your dashboard menu and click the “Backup Now” button.
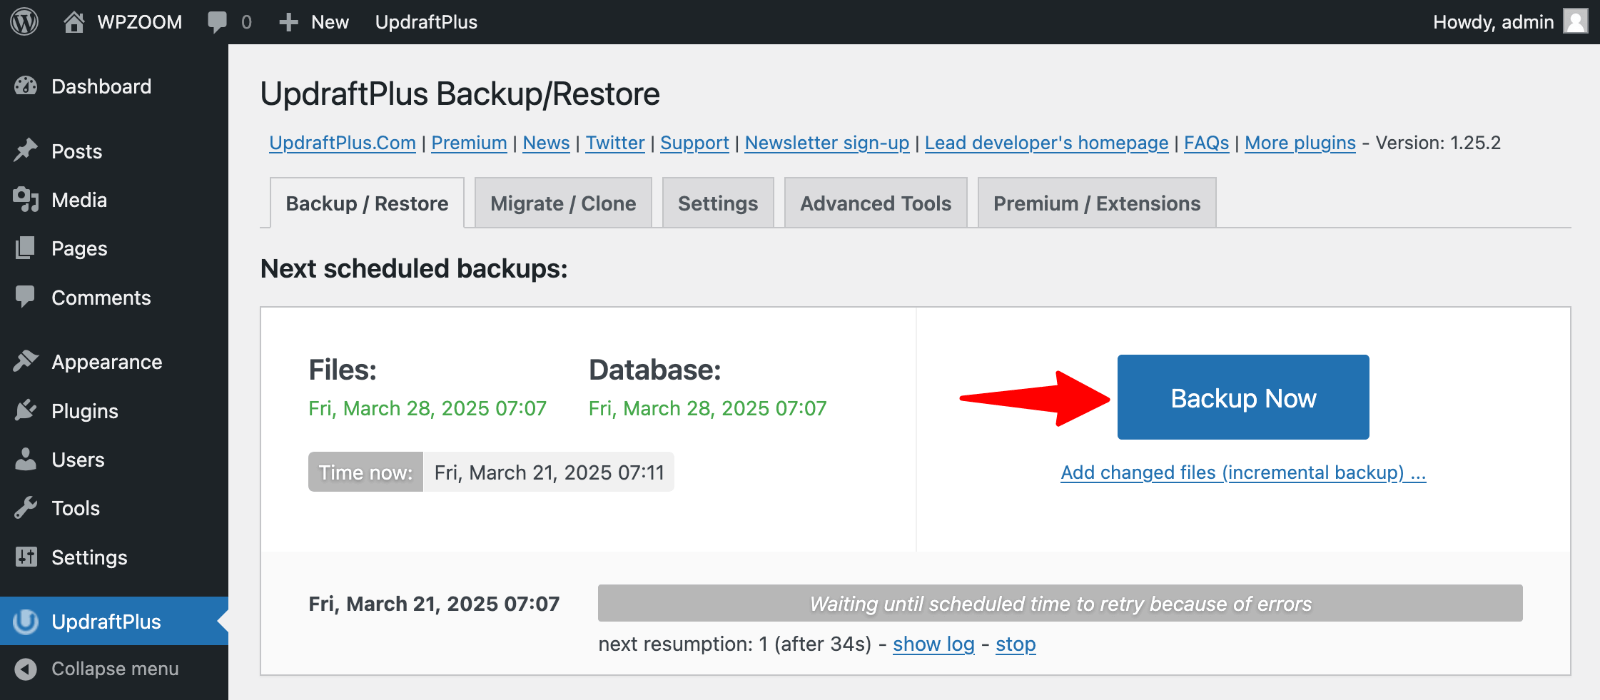
Check the boxes for both files and database and click “Backup Now“.

Wait for the backup process to complete.
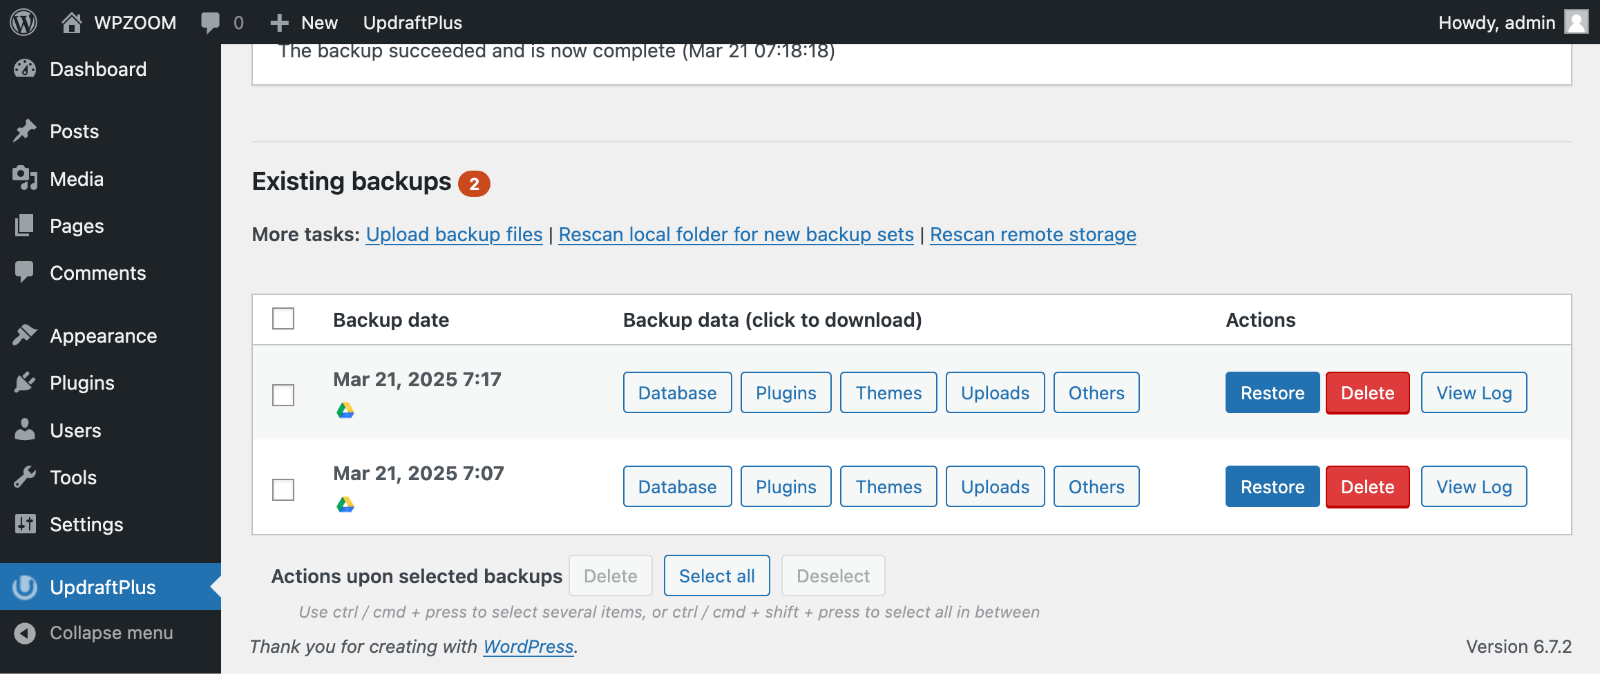
4. Verify your backup.
Once finished, scroll down to the “Existing Backups” section.
Confirm that both database and files appear with the current date.
Restoring From a Plugin Backup
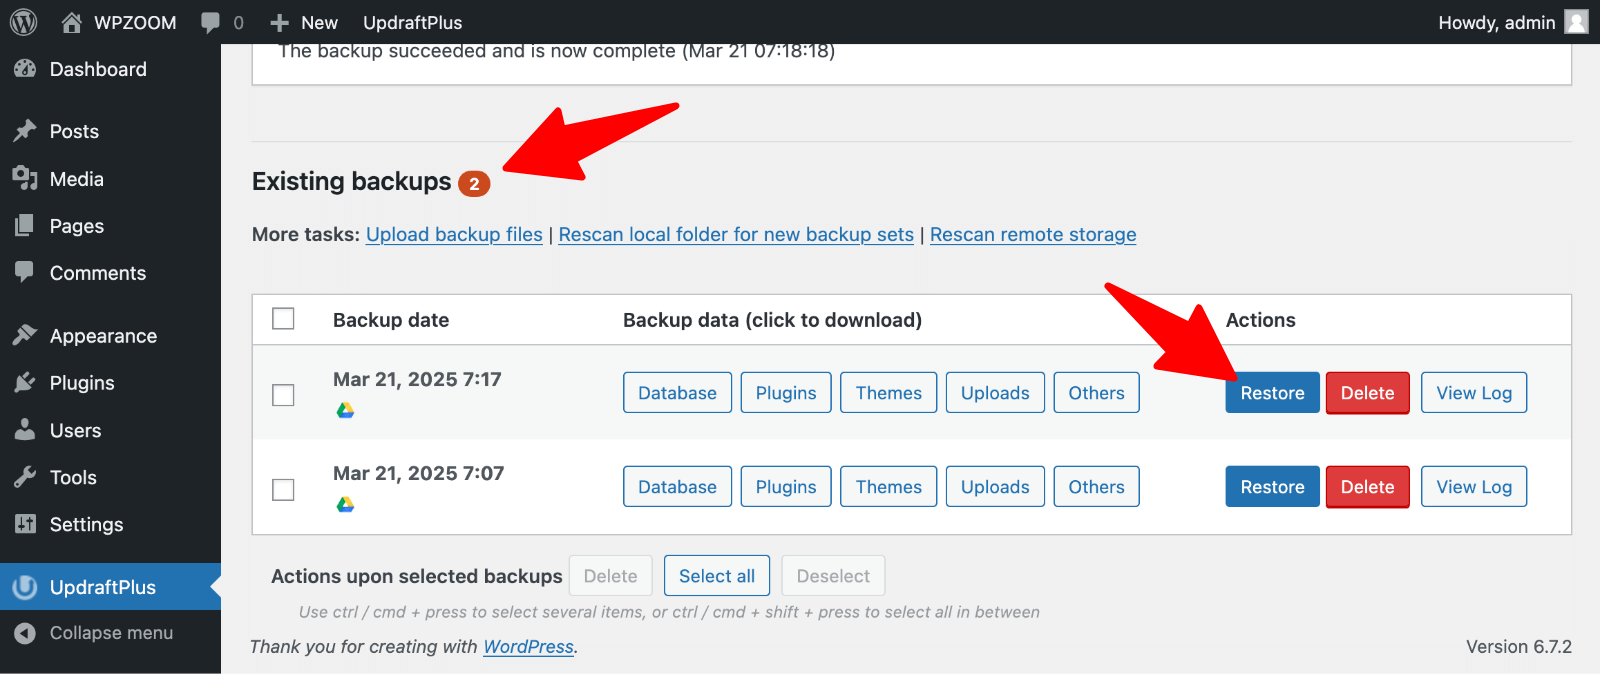
Here’s how to restore your WordPress site from a backup using the UpdraftPlus plugin:
1. Navigate to UpdraftPlus from your WordPress Dashboard and scroll down to Existing backups.
2. Click the “Restore” button.
Alternative WordPress Backup Plugins
While UpdraftPlus works well for most users, several other excellent options exist:
- Duplicator: Perfect for site migration as well as backups. Creates a complete package of your site that can be moved to a new host or domain.
- WP STAGING: This plugin is designed for creating staging sites and provides backup functionalities. It’s handy for testing changes in a safe environment before pushing them live.
- BlogVault: Offers incremental backups and independent dashboard access. Great for large sites as it handles backups without straining your server resources.
- Jetpack VaultPress: Part of the Jetpack suite, this service provides real-time backups and easy one-click restoration, though it requires a subscription.
Upgrade Your Website with a Premium WordPress Theme
Find a theme that you love and get a 10% discount at checkout with the FLASH10 code
Choose your theme
Method 2: Manual WordPress Backups via cPanel
If you prefer not to install additional plugins or want a secondary backup method, cPanel provides powerful tools to create complete site backups. Most hosting providers offer cPanel access, making this approach widely available to WordPress users.
When to Use cPanel Backups
Manual cPanel backups work well when:
- You want to avoid adding plugins to your site
- You need a one-time backup before making major changes
- You’re planning to migrate your site to a new host
- You want an additional layer of protection beyond plugin backups
Accessing Your cPanel Dashboard
First, you’ll need to log into your hosting account:
- Visit your hosting provider’s website.
- Log in to your account dashboard.
- Look for cPanel access (usually labeled “cPanel” or “Website Management”).
- Enter your cPanel credentials if prompted.
Backing Up WordPress Files via cPanel File Manager
Your WordPress installation consists of numerous files and folders that need backing up:
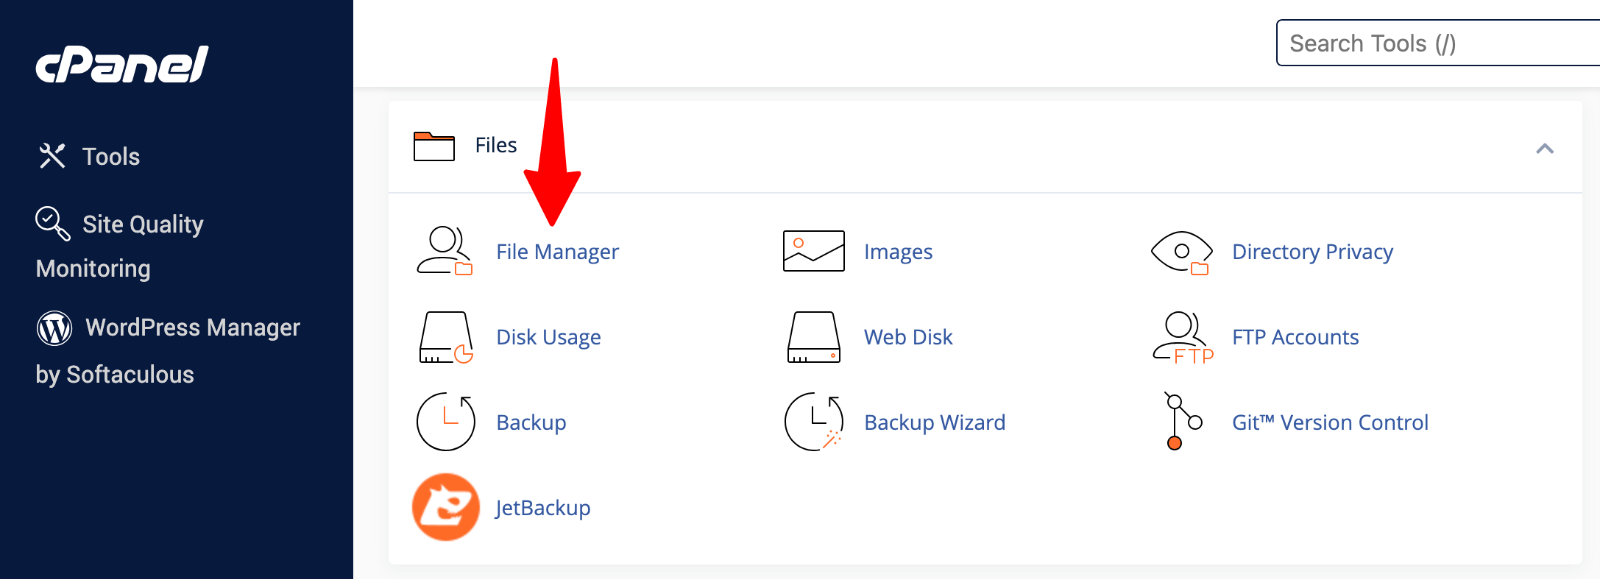
1. In cPanel, find and click “File Manager”.
2. Navigate to your WordPress installation folder (often in public_html).
Select all folders and files and click “Compress” from the top menu.
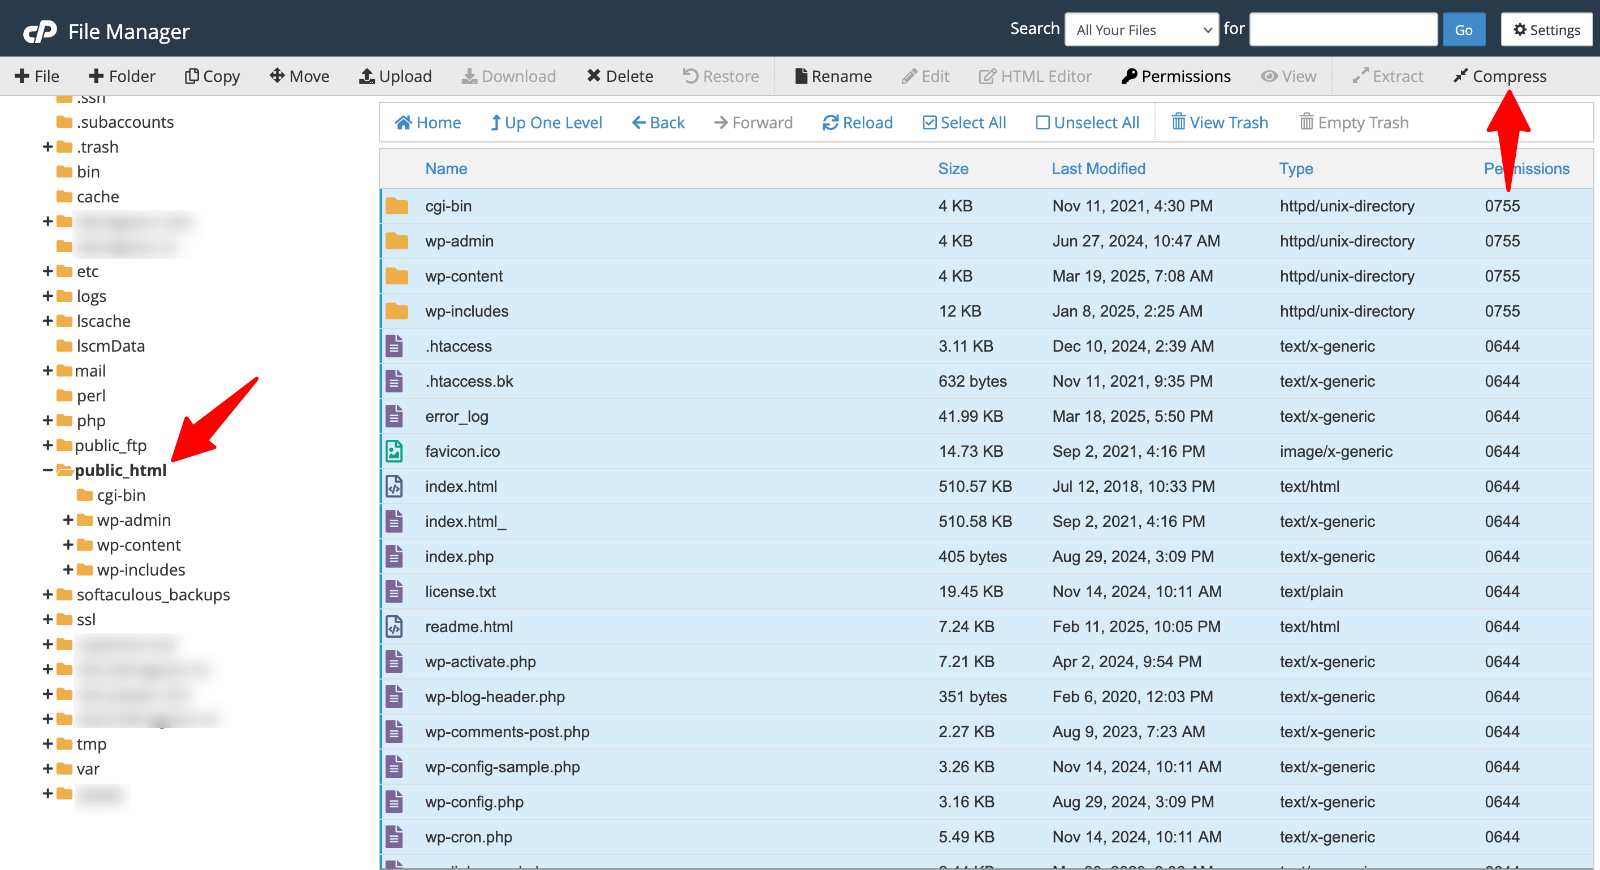
5. Choose “ZIP” as your compression format.
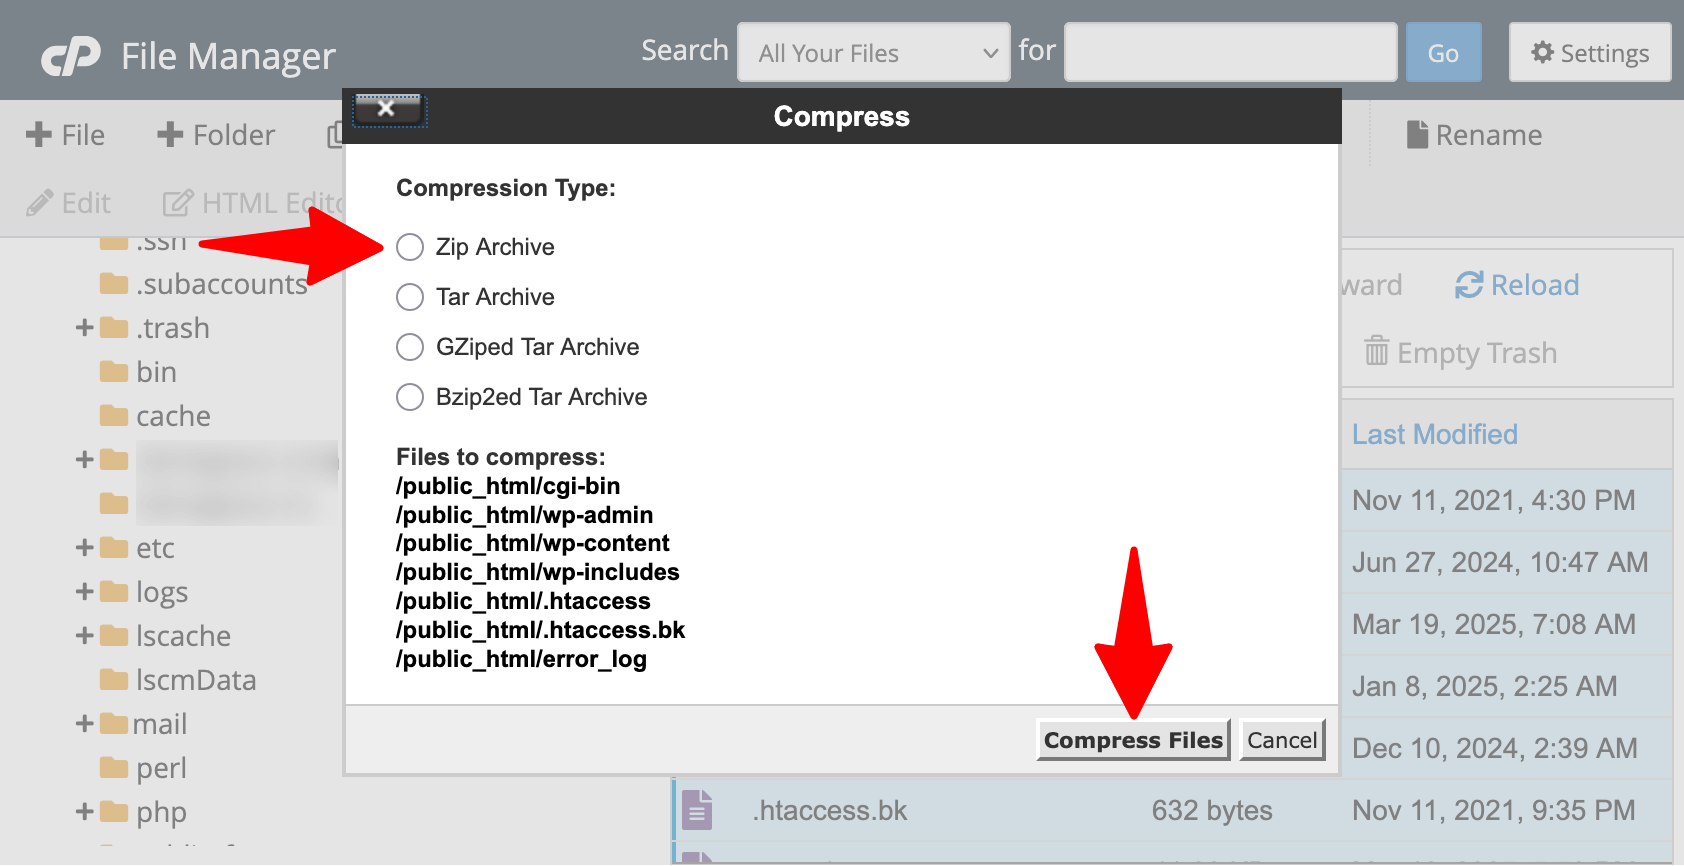
6. Wait for compression to complete and download the ZIP file to your computer.
This process captures all your WordPress files, including themes, plugins, uploads, and core files.
Backing Up Your WordPress Database via cPanel
Your database contains all your posts, pages, comments, and settings. Here’s how to back it up:
1. In cPanel, find and click “phpMyAdmin“.
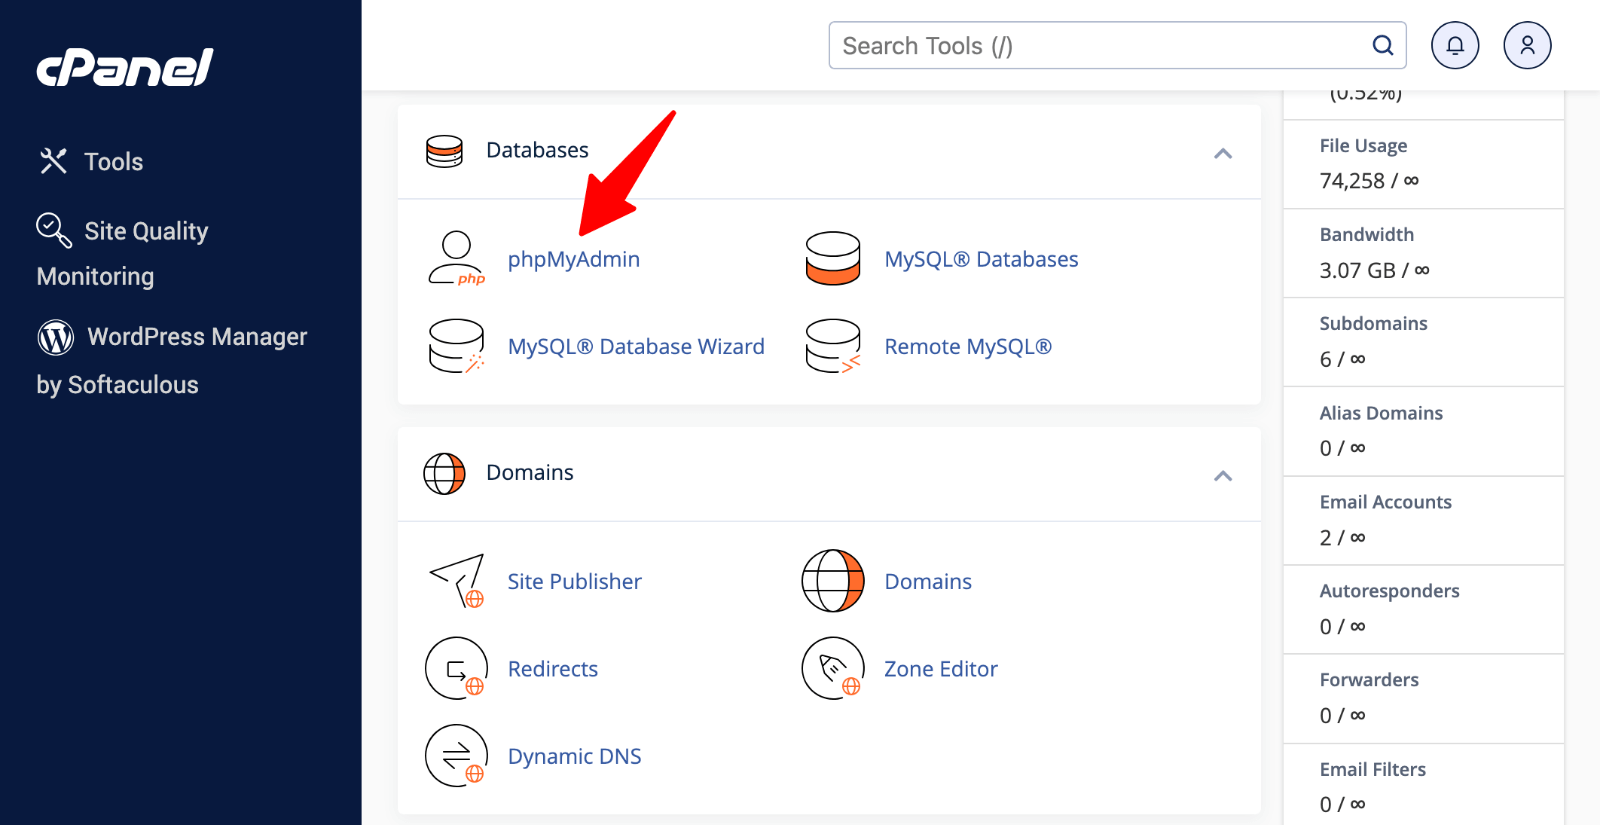
2. Select your WordPress database from the left sidebar.
Click the “Export” tab at the top.
Choose the “Quick” export method and “SQL” format.
Click “Export” to start the export.

6. Save the SQL file to your computer.
For a complete backup, you need both the files (ZIP) and the database (SQL). Store them together in a secure location.
Automating cPanel Backups
Some hosting providers allow scheduled backups through cPanel:
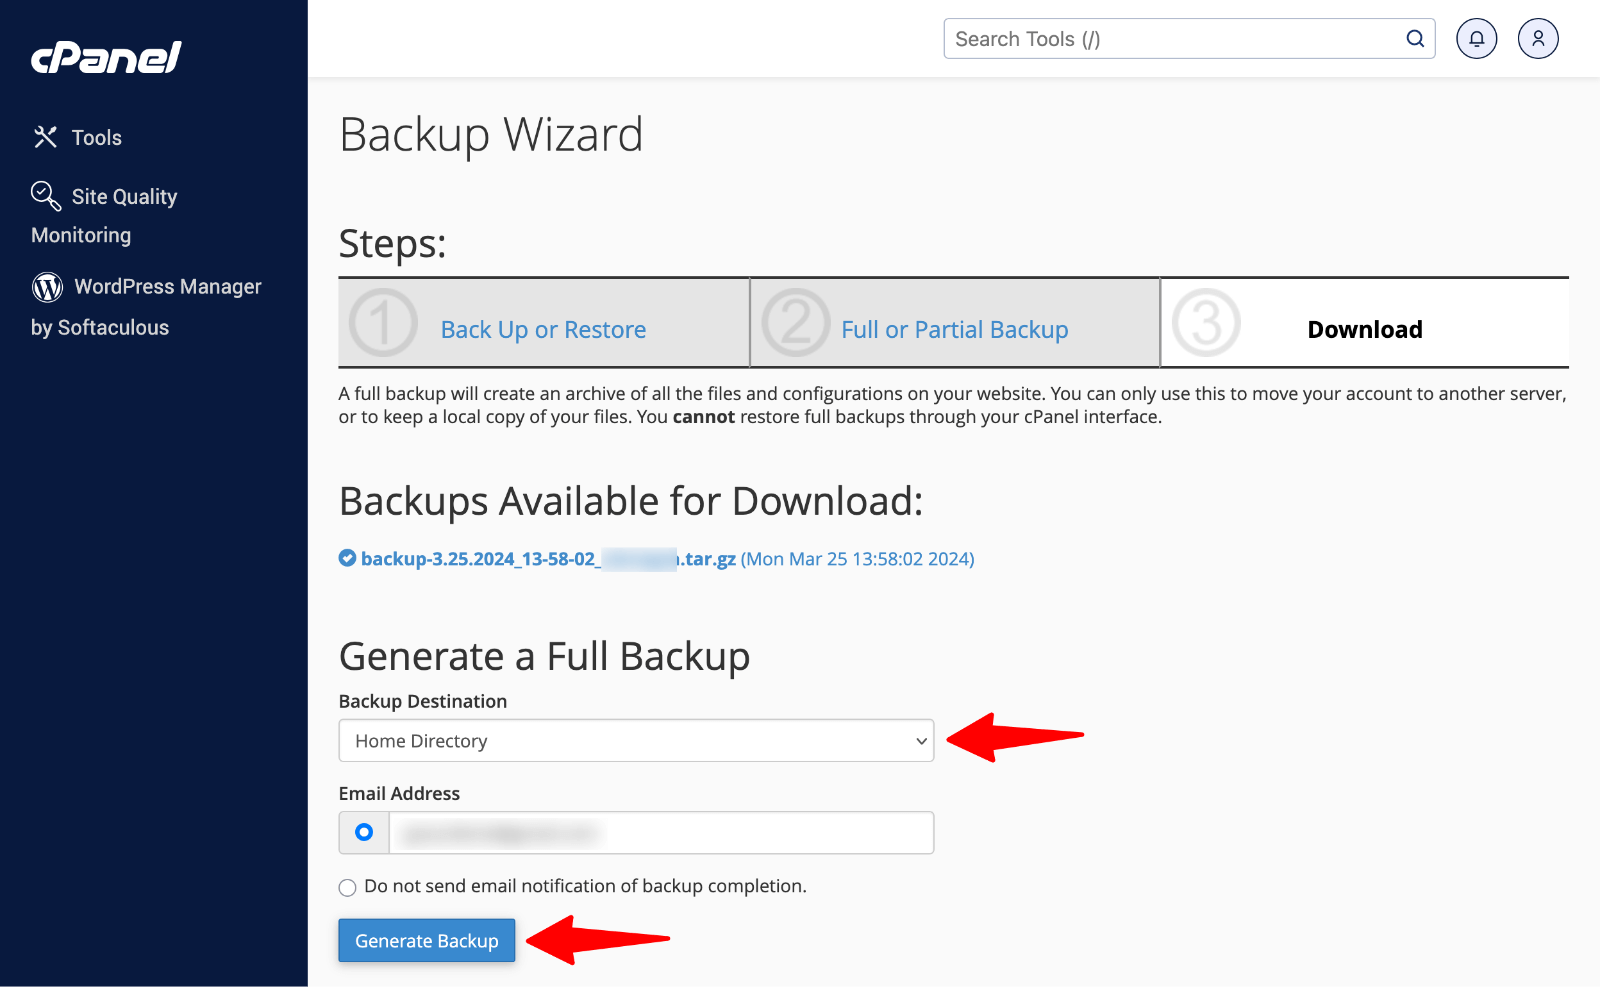
1. In cPanel, look for “Backup” or “Backup Wizard“.
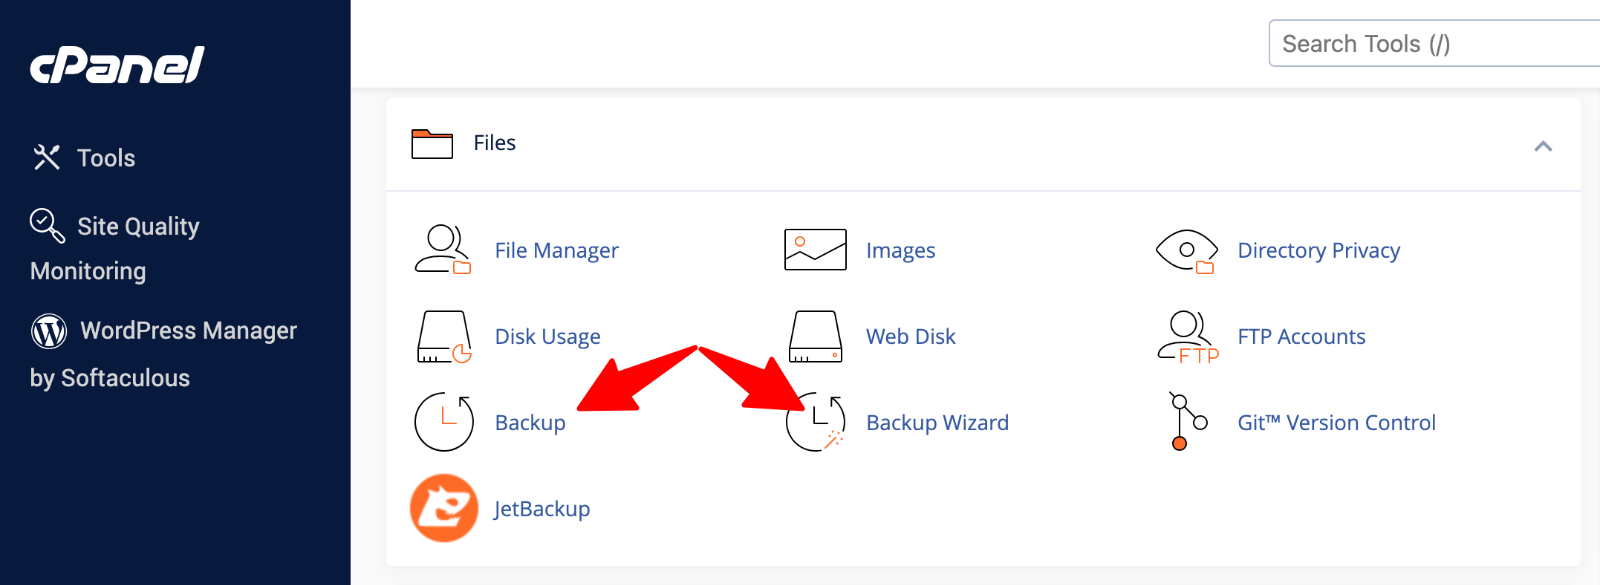
2. Select “Full Backup” or separate options for files and database.

3. Choose your preferred storage location and click “Generate Backup“.
Restoring From a Manual cPanel Backup
If you’ve created backups using cPanel, the restoration process involves two parts:
Files Restoration
- Log into cPanel.
- Open File Manager.
- Navigate to your WordPress directory.
- Remove existing files if necessary.
- Upload your backup ZIP file.
- Extract the contents.
Database Restoration
- Access phpMyAdmin through cPanel.
- Select your WordPress database.
- Click the “Import” tab.
- Choose your database backup SQL file.
- Click “Import” to execute the import.
Method 3: Backing Up WordPress Files Using FTP
FTP (File Transfer Protocol) provides another reliable way to manually back up your WordPress site files. This method gives you direct access to all the files on your server, allowing you to download them to your local computer.
When to Use FTP Backups
FTP backups are particularly useful when:
- You need to download specific files or folders
- You can’t access your WordPress admin area
- Your site is too large for cPanel compression
- You want more control over which files to back up
Setting Up an FTP Connection
Before starting, you’ll need to install an FTP client and your connection credentials:
- Download an FTP client. FileZilla is a popular free option (available for Windows, Mac, and Linux). Other options include Cyberduck, WinSCP, or FTP features built into code editors
- Gather your FTP credentials. Host/server address (often your domain or a specific FTP address), username and password, and port number (typically 21 for standard FTP).
- You can find these details in your hosting account dashboard or welcome email.
- Connect to your server. Open your FTP client. Enter your host address, username, password, and port. Click “Connect” or “Quick Connect”.
Once connected, you’ll see your local files on one side and server files on the other.
Downloading WordPress Files
To back up your WordPress installation:
- Navigate to your WordPress root directory on the server panel. This is typically inside public_html, www, or httpdocs folders. You’ll recognize it as the folder containing wp-admin, wp-content, and other WordPress files.
- Select all files and folders in this directory. Use Ctrl+A (Windows) or Command+A (Mac) to select everything. Or manually select the essential folders: wp-admin, wp-content, wp-includes, and all files in the root directory.
- Create a destination folder on your local computer. Organize by date or site name for easier management.
- Right-click the selected files and choose “Download.” Or drag the files from the server panel to your local folder.

Important reminder about databases! FTP only backs up your site files, not your database. For a complete backup, you need to export your database separately using phpMyAdmin as described in the previous section. Without the database, you won’t have your posts, pages, comments, or settings.
Restoring From FTP Backups
FTP restoration works similarly to cPanel file restoration:
- Connect to your server using FileZilla or another FTP client.
- Navigate to your WordPress directory.
- Upload your backed-up WordPress files.
- Import your database separately using phpMyAdmin.
Method 4: Using Your Hosting Provider’s Backup Solutions
Many WordPress hosting companies include backup features as part of their service packages. These built-in tools can save you time and effort while providing reliable protection for your site.
Host-provided backups vary widely between companies. Some offer comprehensive daily backups with one-click restoration, while others provide more basic solutions with limited retention periods.
While each provider’s interface differs, you can typically find backup features by:
- Logging into your hosting account dashboard
- Looking for sections labeled “Backups,” “Security,” or “Website Tools”
- Following your host’s specific instructions for creating or restoring backups
Some hosts provide access through cPanel (often labeled “Backup Wizard” or “Backup”), while others have custom dashboards.
Limitations of Host-Provided Backups
Despite their convenience, hosting backups have potential drawbacks:
- They may be stored on the same server as your website, making them vulnerable to server-wide issues
- Access might require contacting support rather than direct user control
- Some hosts delete backups immediately if you cancel your service
- Restoration might not be instant during emergencies
For these reasons, many WordPress professionals recommend using hosting backups as a secondary method alongside another solution you control directly.
Using Hosting Provider Restoration Tools
Many hosts offer simplified restoration processes:
- Log into your hosting dashboard.
- Find the backup/restore section.
- Select the backup point you wish to restore.
- Follow your host’s specific instructions to complete the restoration.
Some hosts offer partial restorations, allowing you to recover specific files rather than the entire site.
Where to Store Your WordPress Backups Securely
Creating backups is only half the solution. Storing them properly is equally important. The correct storage strategy ensures your backups remain accessible when needed while staying protected from threats.
Follow the 3-2-1 Backup Rule
Security experts recommend following the 3-2-1 rule for critical data:
- Keep 3 total copies of your data
- Store 2 copies on different storage types
- Keep 1 copy offsite (away from your main location)
This approach protects against various failure scenarios, from accidental deletion to physical disasters.
Cloud Storage Options
Cloud storage provides reliable offsite backup locations with these advantages:
- Google Drive: Offers 15GB of free storage and seamless integration with many backup plugins. Its reliable infrastructure makes it a popular choice for WordPress site owners.
- Dropbox: Features user-friendly interfaces and selective sync options. While the free tier offers limited space, paid plans provide ample storage for website backups.
- Amazon S3: Delivers enterprise-level reliability with pay-as-you-go pricing. Though more technical to set up, many backup plugins support direct S3 integration.
- OneDrive: Microsoft’s solution provides good storage capacity and integration options for those already using Microsoft services.
Most WordPress backup plugins allow direct connections to these services, automating the offsite storage process.
Local Storage Considerations
While cloud storage offers convenience, local copies provide immediate access and additional security:
- External hard drives provide large capacity at reasonable costs
- USB flash drives work well for smaller sites
- Network Attached Storage (NAS) systems offer both local access and network availability
Remember that local storage becomes vulnerable to physical threats like theft, fire, or hardware failure, making it important to maintain offsite copies as well.
Encryption and Security
Regardless of where you store backups, protecting their contents matters:
- Password-protect backup ZIP files when possible
- Use backup plugins that offer encryption features
- Ensure cloud storage accounts have strong, unique passwords
- Enable two-factor authentication for cloud storage services
- Regularly review access permissions for shared storage
Backup Rotation Strategy
Rather than overwriting the same backup file, implement a rotation strategy:
- Keep daily backups for the past week
- Maintain weekly backups for the past month
- Store monthly backups for the past year
This approach provides restoration points at various time intervals, protecting against issues that might not be discovered immediately.
Why Backing Up Your WordPress Site Is Non-Negotiable
Despite understanding the importance of backups, many site owners still neglect this critical task. Let’s explore why WordPress backups should be a fundamental part of your website maintenance routine.
- Protection Against Security Threats. WordPress sites face constant security challenges: malware attacks, brute force attempts, and SQL injection. A recent backup provides an escape route from these scenarios, allowing you to restore your site to its pre-attack state without starting from scratch.
- Recovery From Technical Failures. Even with perfect security, technical issues happen. Plugin conflicts can break site functionality after updates. Theme updates might cause unexpected display problems. Server failures at your hosting provider can result in data loss. Regular backups allow you to quickly roll back to a working version while solving the underlying problem.
- Protection From Human Error. Sometimes, the biggest threat comes from authorized users. Accidental deletion of posts, pages, or media files can occur. Incorrect settings changes might break site functionality. Failed updates performed without pre-update backups can cause issues. We all make mistakes. Backups allow you to recover from these errors without permanent consequences.
- Business Continuity Insurance. E-commerce sites need to protect products, orders, and customer information. Membership sites contain user accounts and subscription details. Every hour of downtime means lost revenue and damaged customer trust. Quick restoration from backups minimizes these losses and maintains your professional reputation.
Remember that prevention costs far less than recovery. The few minutes spent setting up an automatic backup system can save you days of work and countless headaches if disaster strikes. Make WordPress backups a priority today before you need them tomorrow.
Complete Your WordPress Protection with WPZOOM
Now that you’ve secured your WordPress site with a reliable backup strategy, why not enhance its appearance and functionality, too? However, backups are just one aspect of maintaining a professional, secure website.
The foundation of any successful WordPress site is a well-designed, optimized theme that showcases your content while providing the features your visitors expect. That’s where WPZOOM can help.
Our professionally designed themes feature clean code that works seamlessly with backup plugins while delivering stunning visuals and powerful features. Whether you’re running a blog, portfolio, or online store, WPZOOM offers perfect solutions for your specific needs.
Remember, a solid backup strategy paired with a professional theme gives you both protection and presentation, the perfect combination for WordPress success.